


QR codes are a great way to quickly and easily share information with users. Adding a QR code to a WordPress website can be a useful way to provide easy access to a specific webpage or piece of information. QR codes can be scanned with a smartphone camera and will typically take the user to a specific webpage or provide additional information. In this guide, we will walk you through the process of adding a QR code to a WordPress website using the “QR Code Generator” plugin.
Log in to your WordPress dashboard The first step is to log in to your WordPress dashboard. This is where you will be able to access and manage all of the content on your website. Once logged in, you will see the main dashboard with various options on the left-hand side.
Navigate to the “Plugins” menu From the main dashboard, navigate to the “Plugins” menu. This is where you will be able to add, activate, and manage all of the plugins that are installed on your website.
Click on the “Add New” button In the “Plugins” menu, click on the “Add New” button. This will take you to the plugin repository where you can search for new plugins to install.
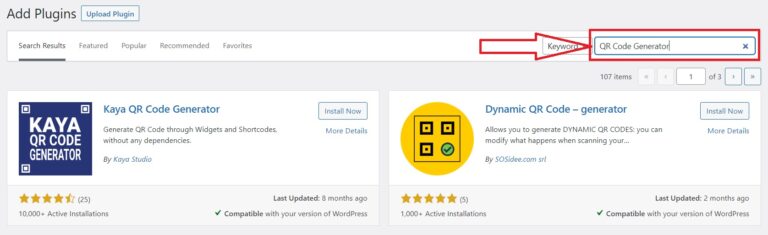
Search for “QR Code Generator” In the search bar, type “QR Code Generator” and hit enter. This will bring up a list of plugins that are related to QR codes.
Install the “QR Code Generator” plugin From the search results, find the “QR Code Generator” plugin and click on the “Install Now” button. The plugin will then be installed on your website.
Activate the “QR Code Generator” plugin Once the plugin is installed, click on the “Activate” button. This will activate the plugin and make it available for use on your website.
Add the QR Code block The QR Code Generator will now be available in the WordPress editor, you can see it in the “Add Block” option. You can add the block to any post or page where you want to display the QR code.
Set the content for the QR code Once you have the block added, you can set the content you want to encode in the QR code. This can be a URL or text. The QR code will be generated based on the content you have set.
Customize the QR code You can also customize the QR code by choosing a size, color, and error correction level. This will allow you to make the QR code more visually appealing and ensure that it can be scanned easily.
Publish or update the page or post Once you are satisfied with the QR code, you can publish or update the page or post where it is located. This will make the QR code live and available for users to scan.
Test the QR code You can now scan the QR code using a smartphone camera app to test it. Make sure that the QR code is working correctly and taking users to the correct webpage or providing the correct information.
In conclusion, adding a QR code to a WordPress website can be a useful and convenient way to provide easy access to specific webpages or information. By using the “QR Code Generator” plugin, you can easily generate and customize QR codes and add them to any post or page on your website. With this guide, you should be able to add a QR code to your WordPress website in just a few simple steps.